Usage Information
Wind speed measurement and analysis are central in the understanding of weather patterns, agricultural performance, environmental protection and many other scientific pursuits.
Classically, The Beaufort Scale was developed to help provide a common basis for the measurement of air speed without dedicated instrumentation.
|
Scale |
Wind Speed/MPH |
Wind Speed/km h-1 |
Description |
|
0 |
1 |
>2 |
Calm |
|
1 |
1-3 |
2-5 |
Light air |
|
2 |
4-7 |
6-11 |
Light breeze |
|
3 |
8-12 |
12-19 |
Gentle breeze |
|
4 |
13-18 |
20-29 |
Moderate breeze |
|
5 |
19-24 |
30-39 |
Fresh breeze |
|
6 |
25-31 |
40-50 |
Strong breeze |
|
7 |
32-38 |
51-61 |
Moderate gale |
|
8 |
39-46 |
62-74 |
Fresh gale |
|
9 |
47-54 |
75-87 |
Strong gale |
|
10 |
55-63 |
88-101 |
Whole gale |
|
11 |
64-72 |
102-116 |
Violent Storm |
|
12 |
73+ |
117+ |
Hurricane |
The forces involved with winds
Of course, many of the above terms are familiar to us in everyday usage, we don't normally think about what that actually relates to in terms of wind speed.
There is, naturally, a link between the pressure systems that generate the above wind conditions. In metrology, "close isobars" are associated with strong wind. The direction of travel of the wind is also determined by the type of cyclonic activity that gives rise to it. Wind speed give us an idea of what is happening. But we can further use this data to make assessments in engineering, since it is the forces that are of concern here.
The standard amount of kinetic energy, E, of a moving body of mass, m, travelling at a velocity, v, is given by:
E = 0.5mv2
Since mass is given by the density, ρ, and volume, φ, then:
E = 0.5ρφv2
E = force × distance
Force = 0.5ρ(φ/distance)v2
Force = 0.5ρv2A
where A = area.
Some typical force values are given.
|
Air density/kg m-3 |
Wind speed/m s-1 |
Wind speed/MPH |
Pressure/N m-2 |
Pressure/ton m-2 |
|
1.2 |
4.4 |
10 |
11.6 |
0.0011 |
|
1.2 |
9 |
20 |
50 |
0.005 |
|
1.2 |
17.8 |
40 |
190 |
0.019 |
|
1.2 |
32.6 |
73 |
638 |
0.065 |
There is perhaps more force than you expect exerting itself against structures! If a building has surface area of 400 m2 facing a hurricane, it will experience 26 tons against it! The Empire State Building's has approximately 50,000 m2 exposed surface, resulting in 3,250 tons against it in a hurricane.
Anemometer construction
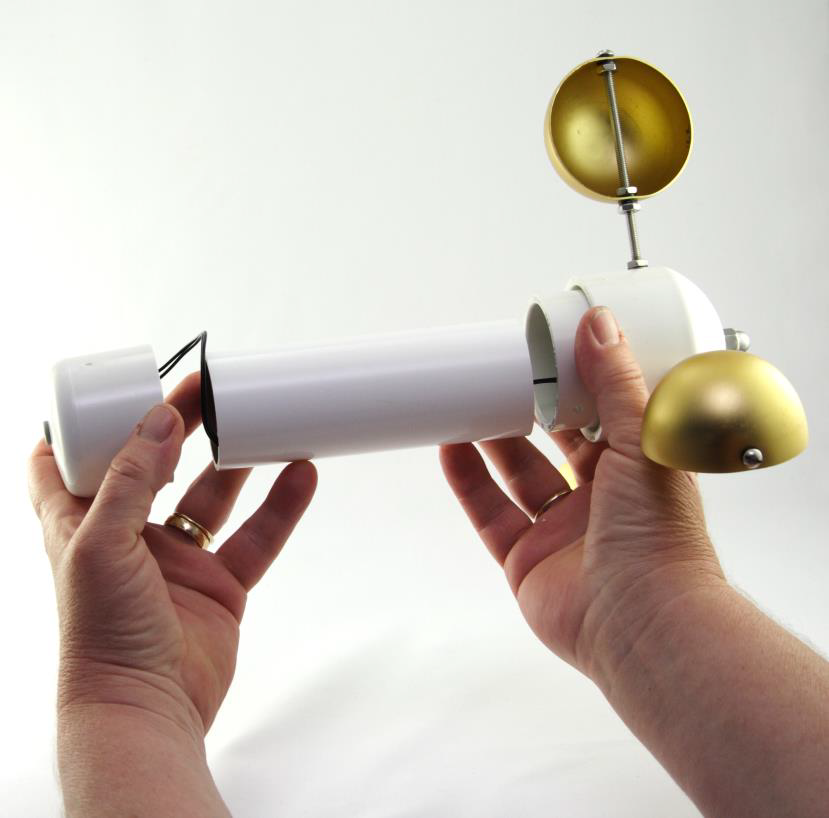
There are a number of designs that may be used to accurately measure air movement. The moving cup is a very well recognised type that is widely used. Rugged, capable of measuring a good range of air speeds and easy to calibrate, this type of instrument is also a very visual indicator for air movement.
The Anemometer in this pack is constructed using a high-quality ball bearing, stainless steel hardware. UV stable plastic, and durable anodized aluminium hemispherical cups that are weight matched all feature in the design.
The Anemometer’s wiring is protected inside a PVC pipe, which allows for easy mounting of the sensor using a 50 mm (2”) pipe clip or similar. The only moving part of the anemometer is a ball bearing, that typically lasts three years in high wind usage, or 10+ years in less extreme scenarios.
Assembly
Assembly of the anemometer is as follows:
1) Push the PVC pipe into the top and then base section – making sure wiring doesn’t get trapped between the pipes.
2) Connect the jack plug (3.5 mm) from one end of the 10 m lead to the socket in the base of the anemometer.
3) Connect the jack plug at the other end of the lead to the jack socket on the side of the Smart Tachometer adapter.
4) Select the range of the air speed when connected to EasySense software.
An anemometer should be mounted so it is in free flowing air. If it is not, then some consideration should be made as to whether adjustments are needed.
The anemometer is supplied with a 10 m lead ending with two 3.5 mm stereo jack plugs. The lead may be lengthened by using a 3.5 mm male/female jack extension cable. The cable connects to the tachometer into one of the two available ports.
Practical considerations
There are several ways to mount an anemometer and you need to determine which is the best based on your situation. Please keep these considerations in mind:
1. Find a location where wind flow will not be obstructed by tall buildings or trees.
2. Mount the anemometer as far away from any obstacle as is practical. Objects such as fences will slow the wind and cause reduced readings.
3. If mounting on a roof, an anemometer should have four feet of clearance above the roof line to avoid any aerodynamic effect that may affect the reading.
4. Avoid mounting the anemometer on an active chimney as the corrosive fumes and heat may damage the sensor.
5. If there is a risk of lightning strike damage, then please consider how to protect it. Data Harvest will not be liable for any damage arising from use in these circumstances.
Maintenance and storage
The instrument should not be cleaned by any plastic solvent, such as acetone.
When storing the anemometer, please try to arrange that storage so that the veins are not placed under stress.